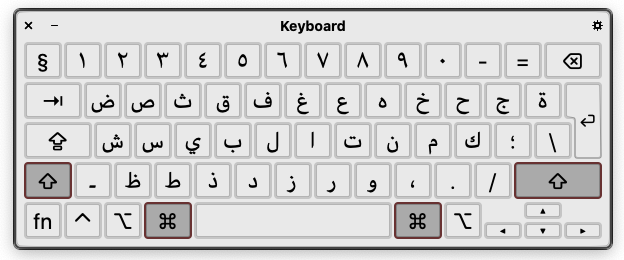
If you're serious about learning Arabic, you will soon be eager type Arabic words rather than copy-paste them. Here are two great (and free) resources and a step-by-step to help you learn to type.
Step 1 - Virtual Keyboards
If you do not own a keyboard with Arabic letters, no problem ! You will add a "virtual" keyboard using your existing one.
on a Mac : Go the Apple menu > System Preferences [ Keyboard tab ] Check the box next to “Show Keyboard & Emoji / Character Viewers in menu bar” then [ Input Sources tab ] Click the + sign and select Arabic
on Linux : more or less look for Settings or System Preferences and follow the same path as for Mac (search for languages or keyboard)
on Windows 10 : Go to Settings, then Time & Language > Region & Language > Add a language > Arabic. We do not own a Windows machine, but this tutorial seems to be up-to-date.
Step 2 - Print out of the Arabic keyboard
Once you have added your virtual keyboard, you can see display an on-screen "viewer" or keyboard like the above screenshot. In the Language menu, Show Keyboard Viewer (Mac) or Settings, Universal Access, Switch on Screen Keyboard (Linux, Ubuntu). We recommend taking a screenshot and having a physical printout, this will be helpful for the tutorials.
Step 3 - Typing Tutorials
There are possibly many websites and commercial softwares for typing tutorials, but at Linguoji, we love 10 Fast Fingers. For Arabic, head to their free tutorial : https://10fastfingers.com/typing-test/arabic
Happy Learning !

Comments
Post a Comment